Project Y Part 1- Homemade Advances in HCI

Welcome!

TriniVoices.com / TriniFans.com is a forum platform for Trinbagonians to connect, discuss topics, share information, and engage in Trinidad & Tobago. Join us today and engage in meaningful conversations!

SignUp Now!

wesgen

New Member
LV
0
 
Joined
Jun 14, 2008
Messages
121
So this visionary by the name of Johnny Chung Lee has been an advocate for more natural interaction between human and computer based systems. As it turns out he is part of the team that is building Project Natal for the Xbox 360

For those that do not know about Project Natal, check the video link below:
(be shocked and amazed at current advances!!!!!!)

[youtube]dWnZOseA3Lw[/youtube] [youtube]DMQaj1EIx58[/youtube] [youtube]GH_gDreIdcM[/youtube]

In the spirit of boosting HCI..Johnny has a blog in which he has shown the public how to hack a Wii Remote in a way to achieve a multitouch screen for any computer system ....If you have a projector you can effectively make a multitouch white board for yourself. Information on that can be viewed on his site:

http://johnnylee.net/projects/wii/

GREAT STUFF THERE^^

In view of this i have chosen to focus at this time on these multitouch capabilities and design my own multitouch whiteboard. Therefore...Enter Project Y

Project Y will be my replication of Johnny's method in an attempt to understand certain facets of multitouch technology so that I may soon develop my own multitouch applications :rolleyes: :evil:

Over the next couple of weeks I will be gathering the materials required for this project and documenting my progress as I get the time.

The list below refers to the parts that I am going to use (The quantities you see below is just for my purpose as i am making multiple pens/input devices):

Software List

1. http://johnnylee.net/projects/wii/Wiimo ... ardv03.zip

3. http://www.bluesoleil.com/download/inde ... ne-headset

Hardware List

1. WII Remote ( i may order one from amazon)

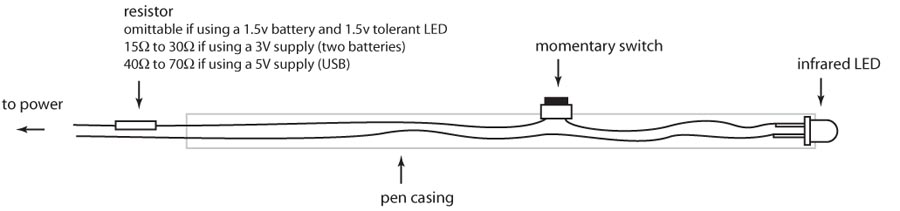
2. At least 10 Infrared (IR) LEDs (must be IR) hmm this hard to find locally eh!! still checking..mite look at outsourcing yes

3. At least 10 markers(10 is just for safety in the event that a LED breaks or a marker casing is damaged... and/or should we decide to make more IR pens)
* the remote suppose to be able to track up to 4 IR points at a time..up to this time i have only seen two work simultaneously..

4. 12 AAA 1.5v batteries (ideally, but not necessarily, the markers should be fat enough to fit one of these batteries inside)

5. Some wire to connect the batteries to the LEDs (enough to create multiple pens)

6. Between 5-10 momentary switches -to turn the lights on and off

7. Bluetooth adapter - to communicate with the remote
Compatible adapters here: http://wiibrew.org/wiki/List_of_Working ... th_Devices

The last two below are not necessary but should you the reader wish to try this as well, this increases the level of interactivity on a larger scale

8. A projector

9. Projector screen / Whiteboard

I have also chosen to get a soldering iron and some solder wire so that I can 'solder/glue/stick' these connections together rather than to simply 'wire tie' them lol

I have not acquired everything as yet but I will soon and will keep you all posted.
Maybe some more ppl mite try this too :)
 
Program Y Part 1- Homemade Advances In HCI

This is the kind of thing i obsessively daydream about! Now its fairly achievable with moderate financing and skill.. oooO.
You just boosted my interest in my school work. I wanna be able to program for this kind of hardware! Hell- I'll even teach myself.. lol.
 
glad to know..i myself got reeeeellly excited when i saw this and 'some other stuff!'...who knows soon we may be making multitouch apps..and end up making trinidad another software powerhouse lol...wait till u hear about my Project Nebula...don't confuse it with Project Y lol...I havent posted details yet...but soon...
 
Wesgen Where have you reached on Project nebula its been some time since you updated us, how is it going, this too interesting to just drop
 
lol yea admin..dont worry i havent dropped it..but i cant post without having the stuff to build it right... right now i'm saving to buy the materials for Nebula...nowhere near the amount I need though :(
Project Y on the other hand is working and complete....gonna type up a lil thing about it this week
 
Good to know dude, so how far you reached 10% 20% its good to know someone in Trinidad is tacking this kind of project,
 
oo...this is really cool dude...u hav my support!!! If yuh need help in any way i will!
 
Okay..this little report is long overdue lol.. Unfortunately I no longer have a digital camera so I have no pics to post :(

Overview
The aim of Project Y was to create a cost effective add-on to my laptop so that touch based communication could be made possible on the laptop screen thereby allowing interaction with my system without the use of the mouse/track pad. I googled around, to find a way in which this could be possible. Within about three minutes I found the solution. It required a relatively simple setup with some relatively cheap components. It would not have been the most elegant solution for me but this would serve as a stepping stone to another project.

Concept
The solution was originally invented by Johnny Lee who as it turns out was on Project Natal team as well. To sum it up the concept involved using an infrared based camera that can track only infrared light. Where ever the infrared light is picked up on a calibrated screen- which could be from an LCD or projected surface, the camera picks it up and sends it to the computer software for processing and interpretation.
Johnny Lee has a lot of other DIY projects on his website e.g. head tracking which could be used for games. This and interactive whiteboard i.e. IR touch based screen can be seen at his website: http://johnnylee.net/projects/wii/

Materials Required
I tried to keep the bills for all the stuff that I purchased so you can have a general idea of the local costs, should you decide to do this yourself. The following are the materials were used:

Hardware
Soldering Iron - $40 – the nearest hardware/electrical store
Solder – can’t find the bill but I think it was $5 a feet
USB Bluetooth Adapter – about $25.00 I got mine on amazon.com
Wiimote – about $200 from amazon.com
About 3 momentary switches – about $12 for one at the nearest hardware/electrical store
About 3 markers (big enough to fit an AAA battery inside) - $3 for one. Check any stationary store
Insulated speaker wire I bought a whole reel- but you don’t need that much) $27.99 Radioshack
About 3 Infrared LEDs - $18.19 for one. I checked a lot of places locally for this and it seems that only Radioshack in MovieTowne has this.
X-Acto knife - about $24.50- Check any stationary store
Masking tape – about $ 10 - Check any stationary store
1 AAA battery – not sure how much for it single but its about $12 for a pack anywhere.
2 AA batteries – about $12 anywhere

Software
http://johnnylee.net/projects/wii/WiimoteWhiteboardv03.zip

http://www.bluesoleil.com/download/index.asp?topic=bluetooth-mobilephone-headset
The bluesoleil link above is not necessarily needed really since the Microsoft Bluetooth Stack built into windows works just as well.

All in all, my total TT cost was a little under $405. In your case it may be a little over or under depending on where you get your stuff. I am quite sure though that it won’t cross $550.

This is the official end of Part 1.

Part 2 coming soon...Part 2 to include:
Making the IR LED Pen
Wiimote Positioning
Wiimote/PC Communication and Calibration
Project Y’s Limitations
 
As i told you on msn wow this is excellent thanks for sharing the info with us, but we really need to pics we can't imagine it, its really difficult since since something like this has never been attempted by anyone in Trinidad and Tobago
 
kool hoping that this weekend i'll do a lil diagram n thing and take a pic or 2 with my lappy's webcam
oh btw...this one has been attempted in trinidad before...it was done a few years back by the folks of the trinidad and tobago computer society..the have the vid on youtube somwhere...
Nebula on the other hand...don't think anyone else down here did/doing that
 
Part 2 - These are the best I could have done at this time with regards to the images sorry :(
this is what has to go on when ur expensive digital camera gets stolen in trincity mall...phoq steups...
Making the IR LED Pen
The diagram below which was originally from Johnny Lee’s website shows a typical schematic of the IR pen. I followed my design loosely based on this.
pen.jpg

The first thing to do is to get the marker you bought and remove the ink sponge ‘thingy’ that is on the inside. The simplest way is to pop off the top cap of the marker and take a pair of tweezers and pull it out.
Once this is done, take the X-Acto knife and punch a hole in the marker that is just big enough to fit in your momentary switch. The positioning of this hole is up to you but I recommend that it is created close to where you 2nd finger will be placed when usually writing with a marker.

Next, carefully slice down the middle of the marker starting from the top using the X-Acto blade. Alternatively you could use a pair of scissors. Refer to the image below:

This is how the battery and switch will be laid out in this cross section image below. The LED will go at the tip of the marker and the wires will all be inside the marker, thereby making it a fully self contained device.

The end result was not the most elegant since functionality was the primary concern and not aesthetics. Future versions will serve as improvements in that regard. Simply follow the wiring schematics from above in order for the pen to work. Use a soldering iron or alternatively your finger to bind the wires together to the switch bulb and battery. You may require tape to fasten the wires to the battery though.
If you are using a soldering iron, please refer to youtube video below for a brief introduction to what that involves: (Extreme Caution should be taken if you have never used this before. BE CAREFUL.)
[youtube]BLfXXRfRIzY[/youtube]​

As i mentioned before fuse the wires to the relevant areas according to the schematic image above and you should'nt have any problems. Once all the components are fused and inside the cross section of the marker, take the other cut half and cover it using some tape to stick the two halves together. You could place the cap back on to the top of the marker as well.

This is what my completed version looks like:

Since IR cannot be seen by the human eye, to test it to see if it works simply aim the LED towards a webcam or camera phone and press the switch; you should the bulb light through the computer/phone display.

If you are confused at any point please refer to this link:
http://clinik.net/wiimote/wiimote_info_my_pen_1.php
http://clinik.net/wiimote/wiimote_info_my_pen_2.php
This guy uses some rather illustrative images to show his process. He uses a different type of momentary switch to mine and his design is much more elegant in my opinion! So have a look :)

.....still updating..more to come...
 
Wiimote Positioning

As it turns out the Wiimote has a theoretical distance of about 400ft! That may be in conjunction with the Wii console itself but personally though I think its going to be limited to the range of you USB Bluetooth device which may be about 150~200ft. But then I could be a bit wrong about those figures. Whatever LOL
The main point is just to insure that it is placed far enough in a stationary position so that it can pick up the whole screen that you wish to use. This may be big should you decide to use a projector your project. In my case I just used my laptop screen. The Wiimote’s field of view is just less than 45 degrees so the distance that you place it will be heavily constrained by that factor. Since I had nothing directly in front of the screen to hold up the Wiimote in a stable manner, I made a cradle out of cardboard and stuck it to my ceiling. The drawing below shows how I placed it. Note the drawing is not to scale. How you do it is up to you and your screen and surrounding environment.
Big version:
img.php
th_80623_Untitled_122_424lo.jpg
 
Back
Top