
- Joined
- Nov 13, 2014
- Messages
- 2,914
This is a thread that will show the methods I used as a first timer to building a subwoofer enclosure in a confined space on a tight budget. I hope it will benefit at least someone who may come across it in the future.
Scenario: Box behind backseat of a double cab pickup.
Problem: Even after research there were no available dimensions of fitting an 8" subwoofer behind the backseat.
Solution: The solution was simple. Forget what the internet had to say and pull the seat out, eye ball, measure, eye ball some more and then make a template which i called "Jig" .
.
With that said, I took pieces of scrap wood and designed a very rough template of how my sub box would fit behind the seat. Unfortunately, my workman decided to break my template before I could get a picture of it. Essentially, once the pieces of scrap wood were screwed together to form a corner of the enclosure, I pushed it up against the rear wall and attempted to reinstall the seat. It seemed to work quite well as I could feel some space between the template and the seat itself.
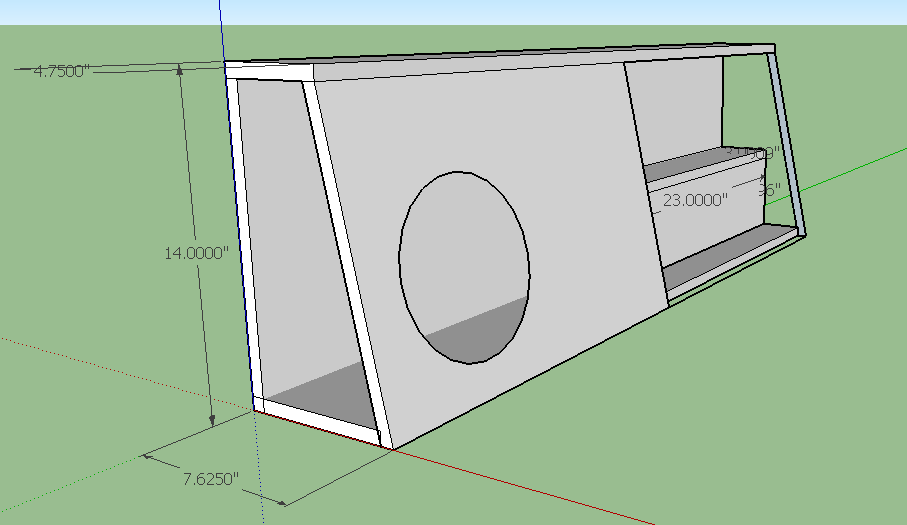
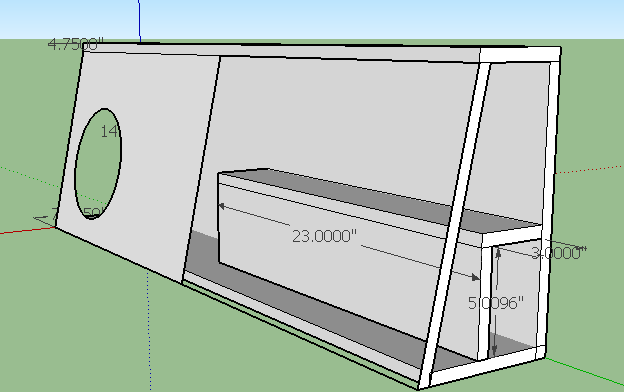
Once the measurements were concluded, I quickly designed a CAD drawing using Sketchup and began playing with the dimensions of my intended subwoofer. The DD 508 subwoofer was chosen, two of them may potentially end up in the box but due to space constraints of the design, there was only 1.4cu ft after material subtraction.
Here is what the CAD design looked like:
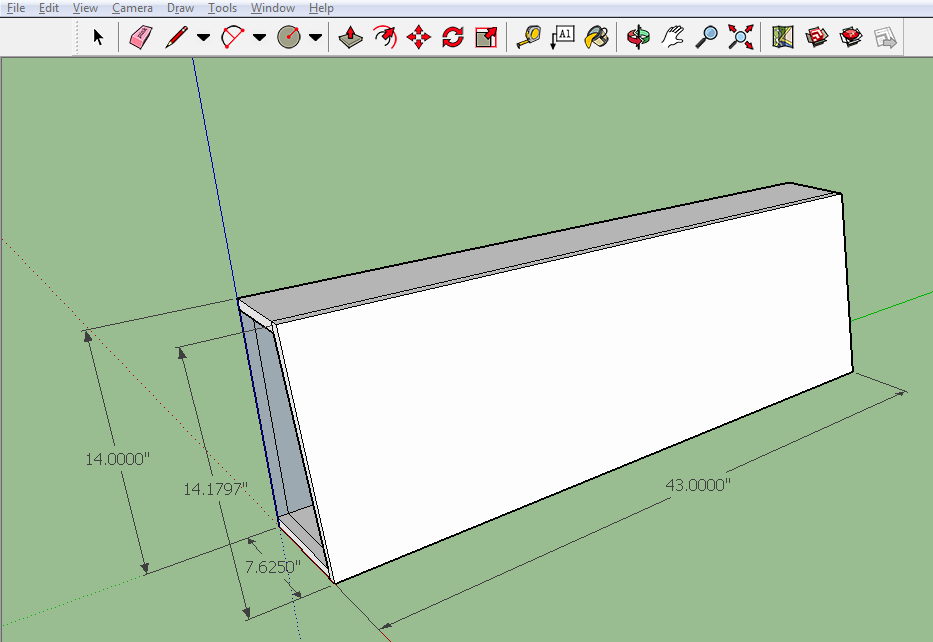
Using this CAD design allowed me to see if my subwoofers would fit. It gave me the opportunity to see 360 degrees, remove and add whatever walls I wanted and it was the best thing to use for the overall design.
*Yes there was no port present, it is a ported enclosure and that will be added using pieces of 2" pipe to save on internal volume.
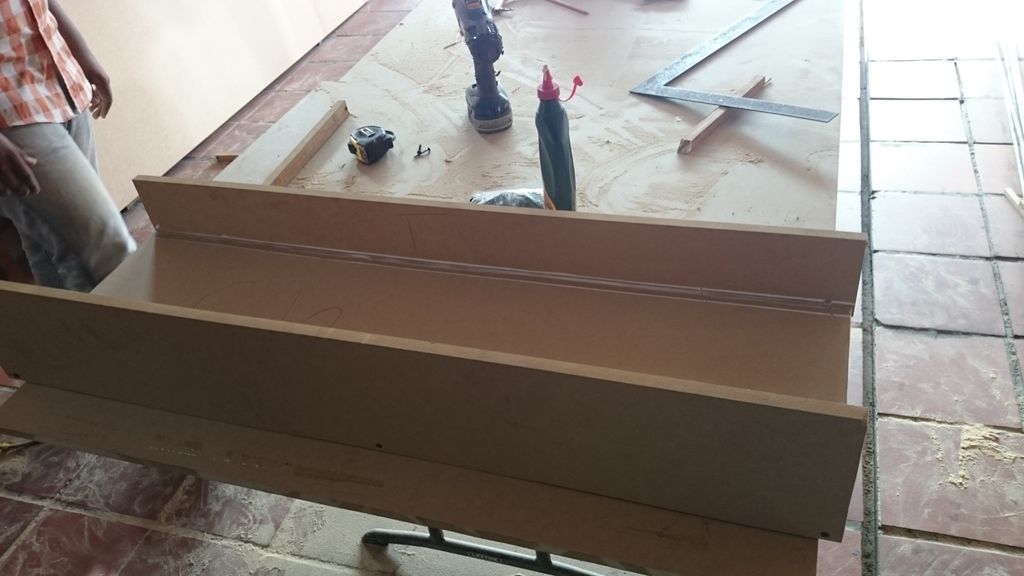
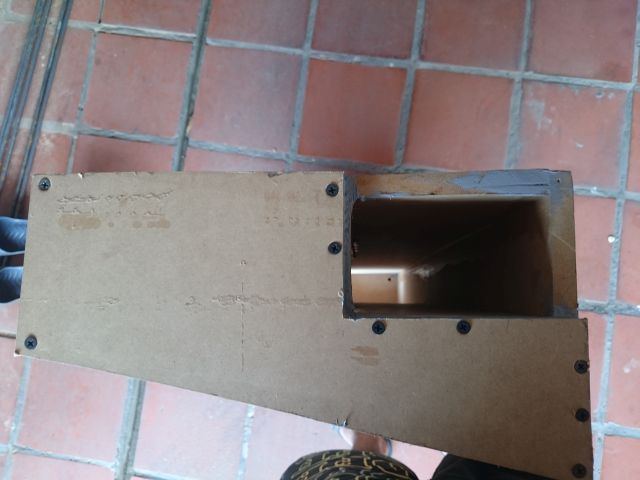
Here was the box under construction.
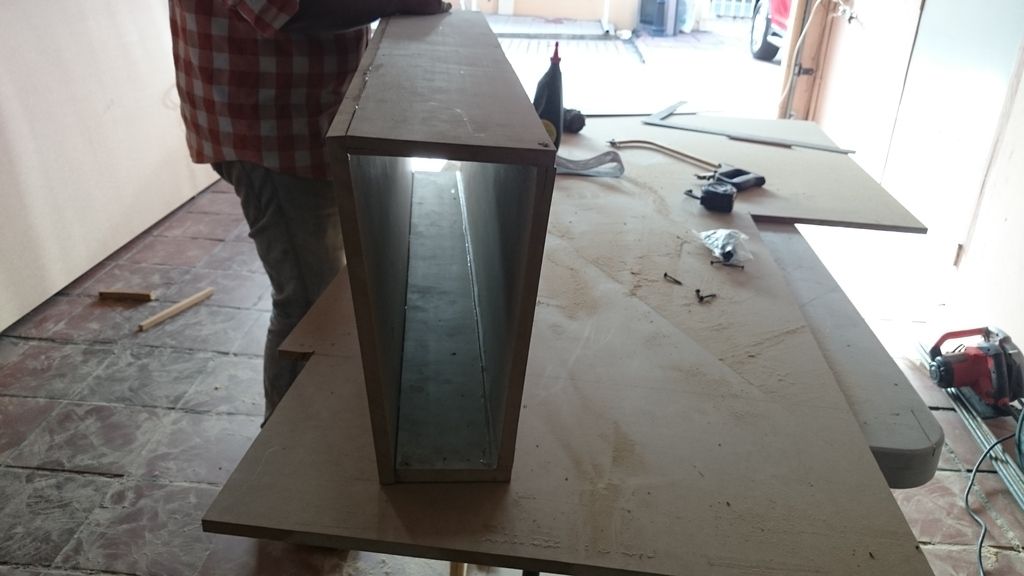
The angled side of the box was sanded to fit a lot better. Neither of us working on this box are professionals and it was my second time building a sub box. While our cuts are not 100% perfect, the box is strong nonetheless and will work perfectly fine.

Seams were filled with glue for proper air tight seals.
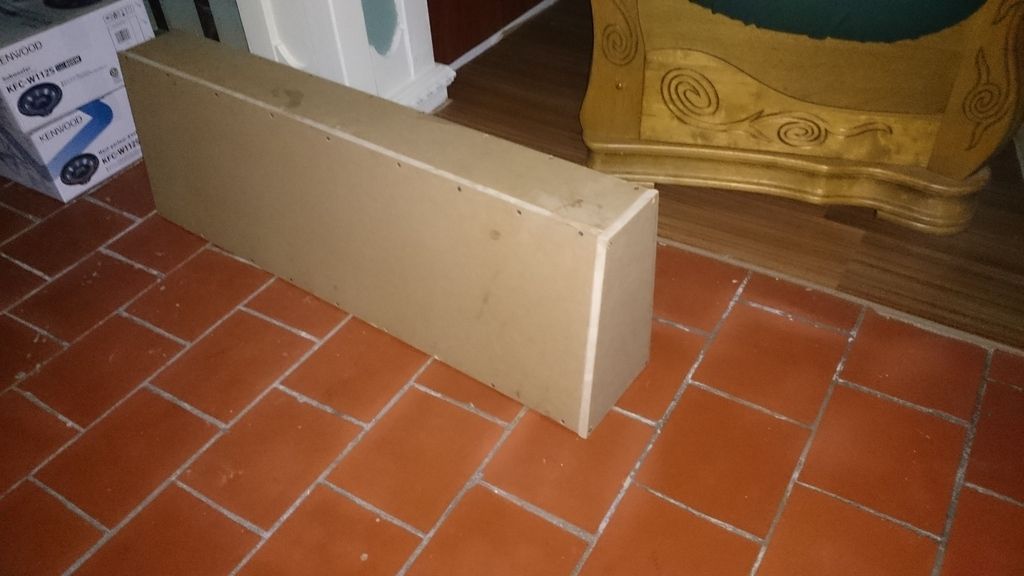
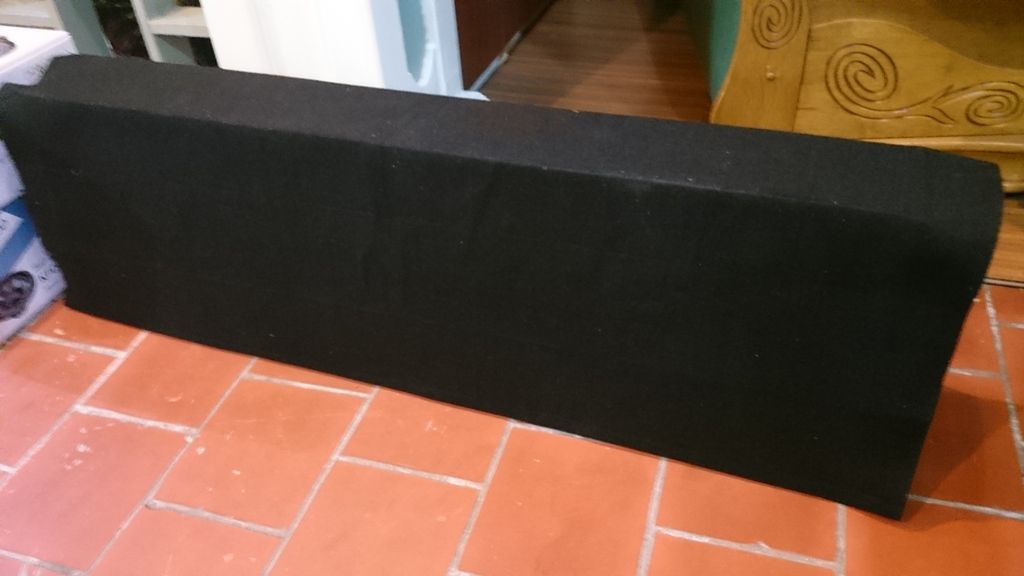
This is currently where it stands.
The box was built for a double cab Mark 6 Toyota Hilux. The dimensions are: 7" base, 14" height, 43" width with a 4.75" top base. This fits behind the seat but is not very easy to install since the seat must be disassembled into 2 parts and then the brackets must be carefully positioned to fit. It was the no choice option in terms of time consumption, budget and the low end bass that is necessary for that "disappearing" bass. However, once fitted, the seat fits all original without moving any brackets or having to modify anything. 100% stealth. I will update this thread as progress with 8" subs in confined spaces continue.
Update: THe carpet was pulled off, the front of the box was removed and the top was cut to fit within the 4.75" width at the top. This allowed a better fit that did not press up against the backseat.
The port was done using MDF and the factory recommendation of 15 sq in by 23" long was used. The port easily displaced .35 of a cu ft and given that there was only 1.454 cu ft of total internal volume, I felt it was best to design the box for 1 8" and should I desire another, I will build a second, more complexed box.
The subwoofer was installed in the truck and the only issue is that the subwoofer hits the back of the seat since I misaveraged and made the cut out a bit too low on the face of the box. Should I have made the cut out for the subwoofer higher, it would have cleared the foam behind the backrest enough to fit without needing a grill.
However, given the facts, I have purchased a grill which is to be installed at the same time the box will be carpeted. I will take pictures of what the box actually looks like with the subwoofer and port attached when I pull it out. For now I can say that I am pretty impressed with the sound, for 1 8" I'm really getting a lot of low end extension without much cancellation.
To give an idea of how this is configured, here is the rest of the system:
DD CS6.5 2 way components were installed the doors prior to the subwoofer. These were placed in the factory locations with the woofer on the lower door panel area with the tweeter on the sail panel behind the mirror. The tweeters are positioned from factory to face each other.
The components are passively crossed over using the DD Passive Crossover and the doors are wired with Stinger 16awg. I chose not to reuse the factory wiring as I found that the factory wire is a bit thin for 50w RMS per side. The components are amped using a Blaupunkt THA275 class A/B amp.
Processing is handled by a Pioneer P4000DVD with 2 pairs of 4 volt "hi-output" rcas. Stinger 2000 series UTP interconnects were used in this install. Future plans may see a newer head unit with active crossovers(Network mode), time alignment and more bands for better Equalization.
This is a predominantly SQ build. It is not designed to be louder than the neighbour's 4 18Sound with 100 15s in the back. It is designed to reproduce an acceptable level of the details present in recordings. As a result the 8" subwoofer was added to give the overall system a boost in imaging and a more "dynamic" sound whereby the subwoofer will blend and seem to be a part of the front stage.
Further Updates:
At this point I felt it was best to get a bit vehicle specific since a lot of people have questions and concerns when installing subwoofers in this type of vehicle. The system is setup in a current gen(mk6) Toyota Hilux. The steps will remain the same for any Hilux/Vigo throughout the period 2006-2015.
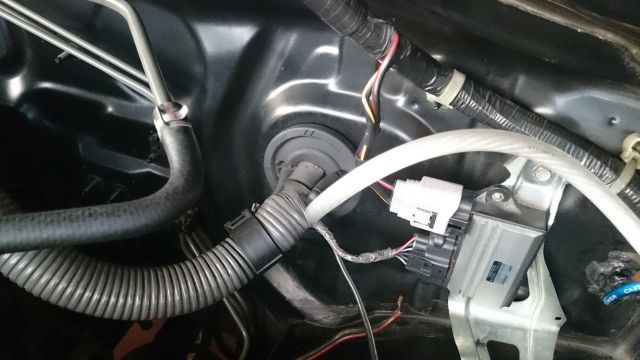
Firstly, I chose to poke a hole in the grommet where the main harness comes out under the dash and into the engine bay on the passenger side, this is where had the most room for a big sized Stinger HPM 4awg wire.
I then routed my wire along the cab floor, hidden from view as I chose to run the wire behind a series of existing brackets.
Here is the wire being ran to under the driver's seat.
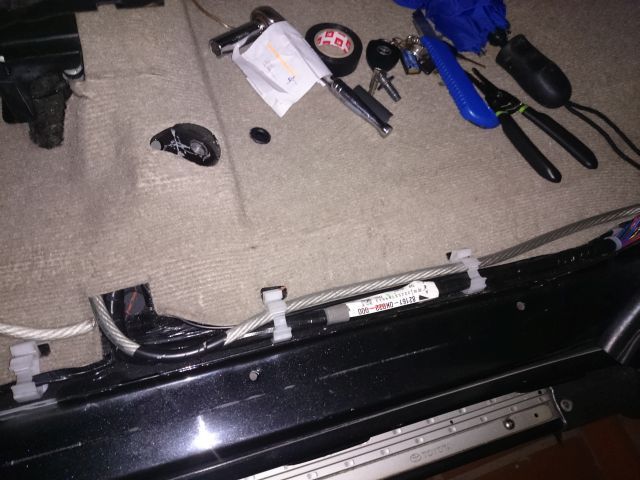
I always run my wire alongside the factory harnesses and have never had a single problem.
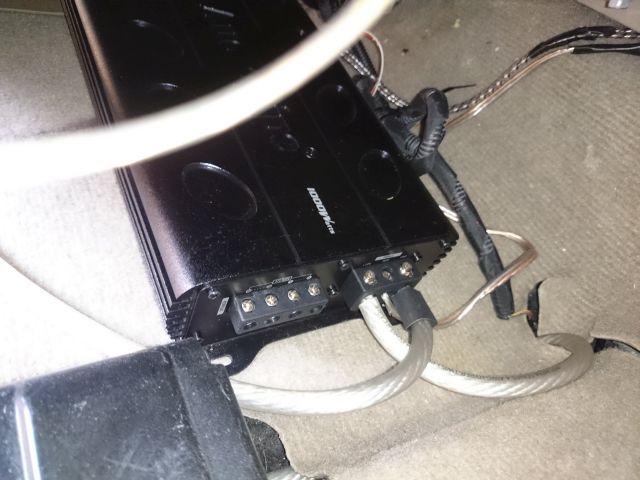
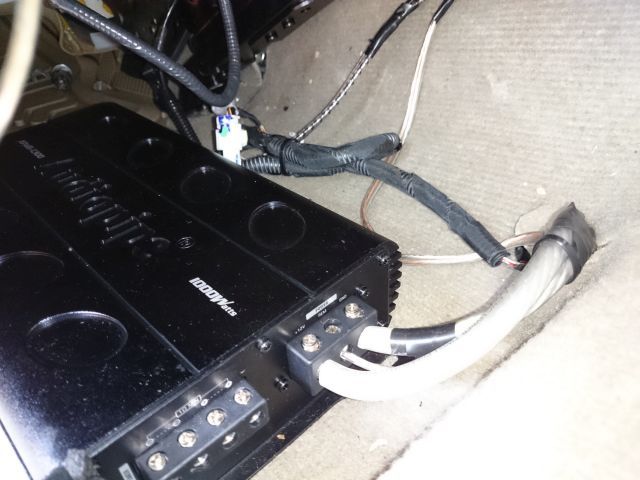
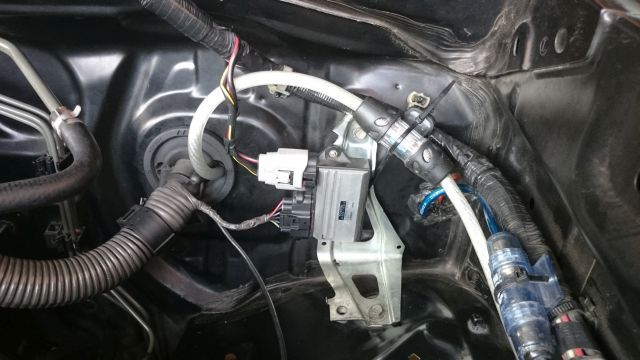
The procedure of getting Power, Ground, Remote turn on and RCA wires to the amp. I had to mount the amp long ways as my driver's seat is out of a Nissan Teana J31(all credits to my dad for that one) and contains a pair of motors which restricts the clearance I had for my amp under the seat.
When it came to grounding the amp, I usually use a seat bolt but the 4 gauge terminals are too small to fit around an M14 bolt so I had to self tap into the frame.
With the amp wired and positioned, I finished off for one night and resumed the next day.
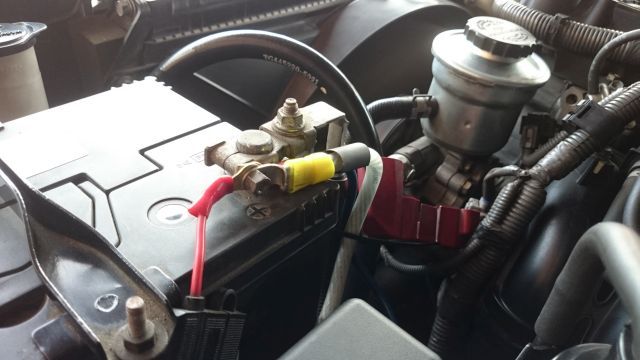
Pictured are 3 ring terminals on the battery positive post. The 4 gauge terminal was crimped with a pair of vice grips and took a very long time. It was my first time working with such thick crimp connectors and it turned out to be a strong connection despite looking spread out and sparsed in the picture. The piece of heat shrink visible was never heated and may be removed since it serves no purpose.
The fuse was zip tied to the main engine harness after carefully looking around for a good spot to place it. I chose to zip tie here because I do not like drilling holes in the vehicle. It was also a good place for easy access should the fuse ever require changing.(Yes the zip tie was cut and fastened)
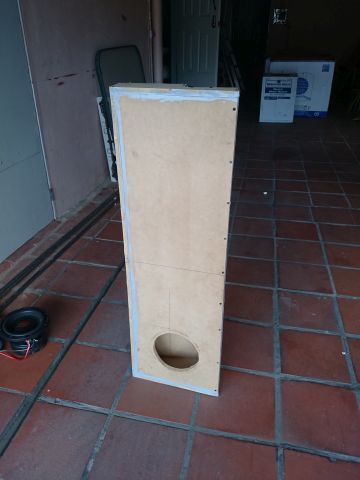
Here is the box that was built by my friend and I.(1.454cu ft internally after 5/8s material subtraction)
5" x 3" port. 15 square inches with 23" length. Exactly what the Digital Designs recommended port specs are for a solid 40-41hz tuning. With an FS(resonant frequency) of 37hz I did not want to tune any lower than 40hz and so the DD port tuning was optimally chosen. After port displacement there was 1.07cu ft left for the subwoofer.
Yes the wood did split on the edge, the hole was predrilled and it still split, as I said, neither of us were professionals and so some inaccuracy was expected. The box was sealed with high vibration silicone.
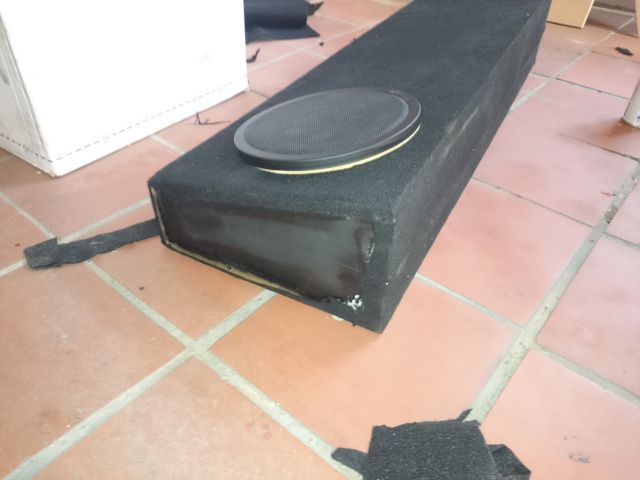
Carpet matched the SR5 rear wall carpet originally!
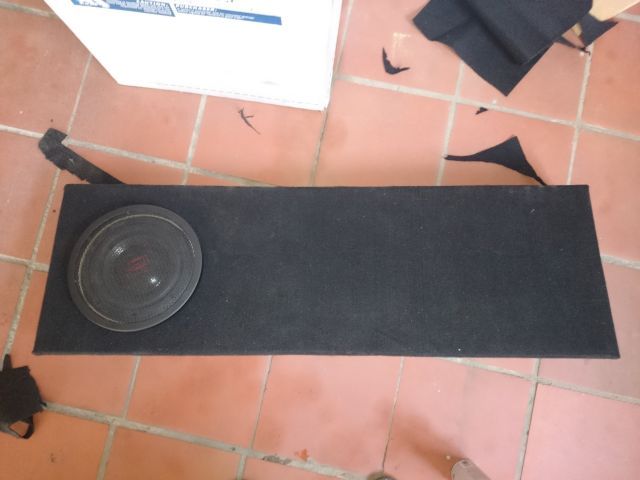
A 10" grill was installed with a 1/2" MDF spacer trim ring. This was necessary since the subwoofer was mounted a bit low in the box.(More on that to the end)
This brings us to the end of my ventures with confined spaced subwoofers. The results were very surprising as there is absolutely no cancellation within the cab, the sound is very full and rich from the little 8" to my surprise. I would do this again with minor adjustments.
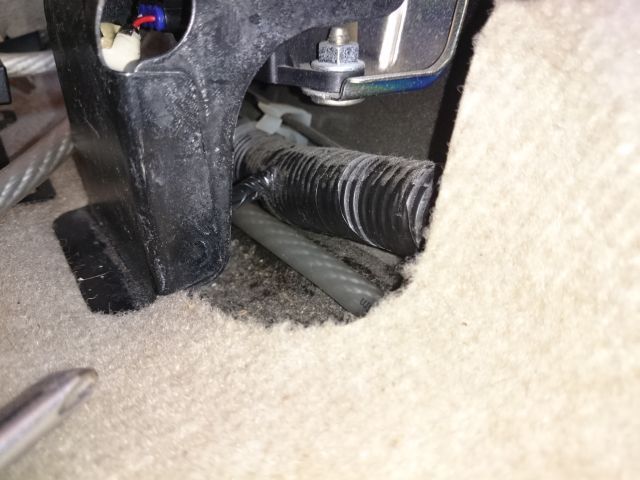
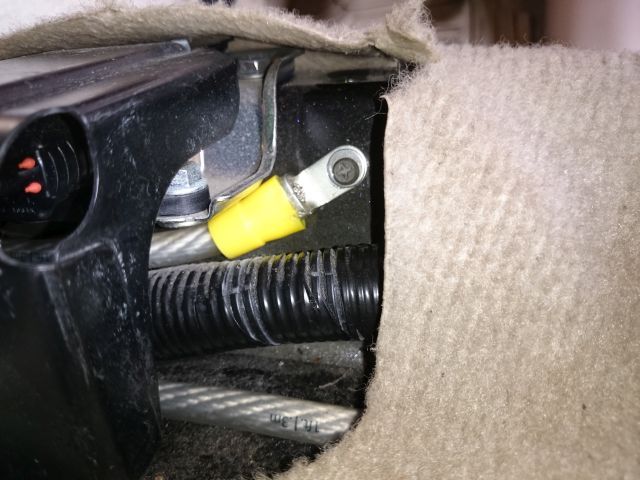
Here are some shots of how the space between the cab wall and the rear seat of the Hilux/Vigo looks.
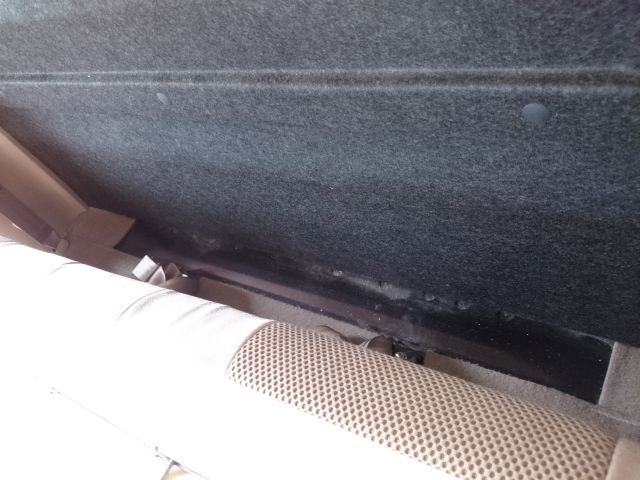
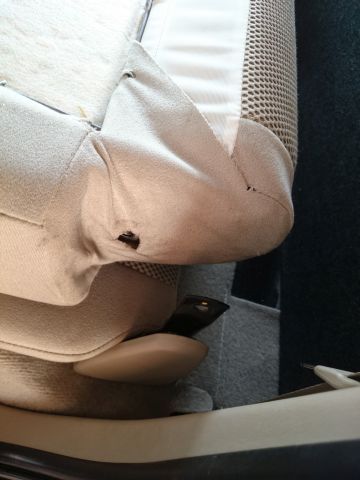
The space is very accommodating for a truck. Overall the system sounds as intended. It is a budget SQ setup with room for improvement if desired but I am very pleased with it thus far.
If I were to do this again I would stick to the original 7" dimensions for the base as the extra 5/8s thickness of choosing to place the face of the box on the outside of the base added up to 7.625" total depth. This was difficult to fit with a grill installed since it not only changed the slope of the face but the extra 5/8s clearance would have made it a lot easier to fit behind the seat. Ideally I wanted to place the monoblock amp behind the seat along with the subwoofer box but in every install that aims to keep things factory, there will be compromise. I drilled 1 hole and every single piece of equipment can be removed with no visible traces of equipment ever being in those locations. That is how I personally like to do my installs as I absolutely hate drilling/cutting a vehicle.
Anyone doing an install in a Hilux, keep in mind that the back rest of the rear seat has a foam hump to the base and if your sub can clear this you will not have any need for a grill since the seat curves outward revealing tons of room for excursion. I made the mistake of not factoring in this hump seriously and paid the price for it.
I also hope this thread will be of use to someone in the future. I know the Hilux is a truck that getting proper bass can be difficult.
Scenario: Box behind backseat of a double cab pickup.
Problem: Even after research there were no available dimensions of fitting an 8" subwoofer behind the backseat.
Solution: The solution was simple. Forget what the internet had to say and pull the seat out, eye ball, measure, eye ball some more and then make a template which i called "Jig"
. With that said, I took pieces of scrap wood and designed a very rough template of how my sub box would fit behind the seat. Unfortunately, my workman decided to break my template before I could get a picture of it. Essentially, once the pieces of scrap wood were screwed together to form a corner of the enclosure, I pushed it up against the rear wall and attempted to reinstall the seat. It seemed to work quite well as I could feel some space between the template and the seat itself.
Once the measurements were concluded, I quickly designed a CAD drawing using Sketchup and began playing with the dimensions of my intended subwoofer. The DD 508 subwoofer was chosen, two of them may potentially end up in the box but due to space constraints of the design, there was only 1.4cu ft after material subtraction.
Here is what the CAD design looked like:

Using this CAD design allowed me to see if my subwoofers would fit. It gave me the opportunity to see 360 degrees, remove and add whatever walls I wanted and it was the best thing to use for the overall design.
*Yes there was no port present, it is a ported enclosure and that will be added using pieces of 2" pipe to save on internal volume.

Here was the box under construction.

The angled side of the box was sanded to fit a lot better. Neither of us working on this box are professionals and it was my second time building a sub box. While our cuts are not 100% perfect, the box is strong nonetheless and will work perfectly fine.

Seams were filled with glue for proper air tight seals.


This is currently where it stands.
The box was built for a double cab Mark 6 Toyota Hilux. The dimensions are: 7" base, 14" height, 43" width with a 4.75" top base. This fits behind the seat but is not very easy to install since the seat must be disassembled into 2 parts and then the brackets must be carefully positioned to fit. It was the no choice option in terms of time consumption, budget and the low end bass that is necessary for that "disappearing" bass. However, once fitted, the seat fits all original without moving any brackets or having to modify anything. 100% stealth. I will update this thread as progress with 8" subs in confined spaces continue.
Update: THe carpet was pulled off, the front of the box was removed and the top was cut to fit within the 4.75" width at the top. This allowed a better fit that did not press up against the backseat.
The port was done using MDF and the factory recommendation of 15 sq in by 23" long was used. The port easily displaced .35 of a cu ft and given that there was only 1.454 cu ft of total internal volume, I felt it was best to design the box for 1 8" and should I desire another, I will build a second, more complexed box.


The subwoofer was installed in the truck and the only issue is that the subwoofer hits the back of the seat since I misaveraged and made the cut out a bit too low on the face of the box. Should I have made the cut out for the subwoofer higher, it would have cleared the foam behind the backrest enough to fit without needing a grill.
However, given the facts, I have purchased a grill which is to be installed at the same time the box will be carpeted. I will take pictures of what the box actually looks like with the subwoofer and port attached when I pull it out. For now I can say that I am pretty impressed with the sound, for 1 8" I'm really getting a lot of low end extension without much cancellation.
To give an idea of how this is configured, here is the rest of the system:
DD CS6.5 2 way components were installed the doors prior to the subwoofer. These were placed in the factory locations with the woofer on the lower door panel area with the tweeter on the sail panel behind the mirror. The tweeters are positioned from factory to face each other.
The components are passively crossed over using the DD Passive Crossover and the doors are wired with Stinger 16awg. I chose not to reuse the factory wiring as I found that the factory wire is a bit thin for 50w RMS per side. The components are amped using a Blaupunkt THA275 class A/B amp.
Processing is handled by a Pioneer P4000DVD with 2 pairs of 4 volt "hi-output" rcas. Stinger 2000 series UTP interconnects were used in this install. Future plans may see a newer head unit with active crossovers(Network mode), time alignment and more bands for better Equalization.
This is a predominantly SQ build. It is not designed to be louder than the neighbour's 4 18Sound with 100 15s in the back. It is designed to reproduce an acceptable level of the details present in recordings. As a result the 8" subwoofer was added to give the overall system a boost in imaging and a more "dynamic" sound whereby the subwoofer will blend and seem to be a part of the front stage.
Further Updates:
At this point I felt it was best to get a bit vehicle specific since a lot of people have questions and concerns when installing subwoofers in this type of vehicle. The system is setup in a current gen(mk6) Toyota Hilux. The steps will remain the same for any Hilux/Vigo throughout the period 2006-2015.
Firstly, I chose to poke a hole in the grommet where the main harness comes out under the dash and into the engine bay on the passenger side, this is where had the most room for a big sized Stinger HPM 4awg wire.

I then routed my wire along the cab floor, hidden from view as I chose to run the wire behind a series of existing brackets.
Here is the wire being ran to under the driver's seat.


I always run my wire alongside the factory harnesses and have never had a single problem.

The procedure of getting Power, Ground, Remote turn on and RCA wires to the amp. I had to mount the amp long ways as my driver's seat is out of a Nissan Teana J31(all credits to my dad for that one) and contains a pair of motors which restricts the clearance I had for my amp under the seat.

When it came to grounding the amp, I usually use a seat bolt but the 4 gauge terminals are too small to fit around an M14 bolt so I had to self tap into the frame.

With the amp wired and positioned, I finished off for one night and resumed the next day.

Pictured are 3 ring terminals on the battery positive post. The 4 gauge terminal was crimped with a pair of vice grips and took a very long time. It was my first time working with such thick crimp connectors and it turned out to be a strong connection despite looking spread out and sparsed in the picture. The piece of heat shrink visible was never heated and may be removed since it serves no purpose.

The fuse was zip tied to the main engine harness after carefully looking around for a good spot to place it. I chose to zip tie here because I do not like drilling holes in the vehicle. It was also a good place for easy access should the fuse ever require changing.(Yes the zip tie was cut and fastened)

Here is the box that was built by my friend and I.(1.454cu ft internally after 5/8s material subtraction)

5" x 3" port. 15 square inches with 23" length. Exactly what the Digital Designs recommended port specs are for a solid 40-41hz tuning. With an FS(resonant frequency) of 37hz I did not want to tune any lower than 40hz and so the DD port tuning was optimally chosen. After port displacement there was 1.07cu ft left for the subwoofer.
Yes the wood did split on the edge, the hole was predrilled and it still split, as I said, neither of us were professionals and so some inaccuracy was expected. The box was sealed with high vibration silicone.

Carpet matched the SR5 rear wall carpet originally!

A 10" grill was installed with a 1/2" MDF spacer trim ring. This was necessary since the subwoofer was mounted a bit low in the box.(More on that to the end)
This brings us to the end of my ventures with confined spaced subwoofers. The results were very surprising as there is absolutely no cancellation within the cab, the sound is very full and rich from the little 8" to my surprise. I would do this again with minor adjustments.
Here are some shots of how the space between the cab wall and the rear seat of the Hilux/Vigo looks.


The space is very accommodating for a truck. Overall the system sounds as intended. It is a budget SQ setup with room for improvement if desired but I am very pleased with it thus far.
If I were to do this again I would stick to the original 7" dimensions for the base as the extra 5/8s thickness of choosing to place the face of the box on the outside of the base added up to 7.625" total depth. This was difficult to fit with a grill installed since it not only changed the slope of the face but the extra 5/8s clearance would have made it a lot easier to fit behind the seat. Ideally I wanted to place the monoblock amp behind the seat along with the subwoofer box but in every install that aims to keep things factory, there will be compromise. I drilled 1 hole and every single piece of equipment can be removed with no visible traces of equipment ever being in those locations. That is how I personally like to do my installs as I absolutely hate drilling/cutting a vehicle.
Anyone doing an install in a Hilux, keep in mind that the back rest of the rear seat has a foam hump to the base and if your sub can clear this you will not have any need for a grill since the seat curves outward revealing tons of room for excursion. I made the mistake of not factoring in this hump seriously and paid the price for it.
I also hope this thread will be of use to someone in the future. I know the Hilux is a truck that getting proper bass can be difficult.
Last edited: