
- Joined
- Nov 13, 2014
- Messages
- 2,914
We all have those times when we wished we could do stuff ourselves cause it seemed quite small and relatively little work. Well, you're in luck , if you've ever wanted to hardwire your dash cam, gps or even cell phone charger into your car to integrate seamlessly without the need to clutter your cigarette lighter sockets with unnecessary plugs and excess wire, I am going to show you how to wire your accessories behind the dash in this tutorial.
Now every accessory that uses a charger as pictured below can be utilized with this guide.
Lets get into it:
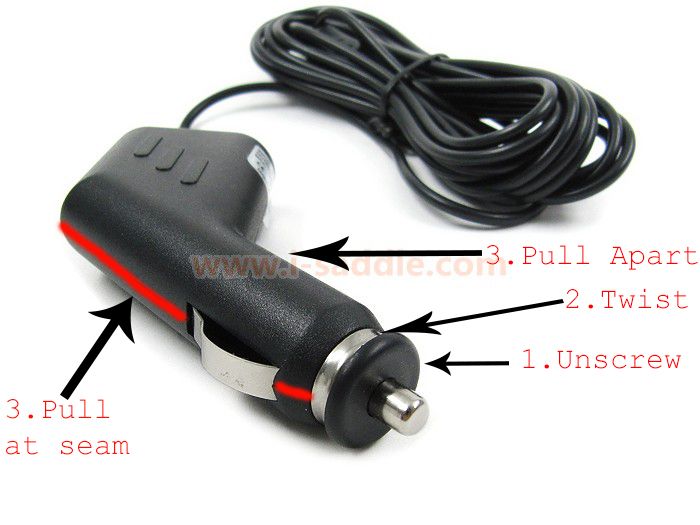
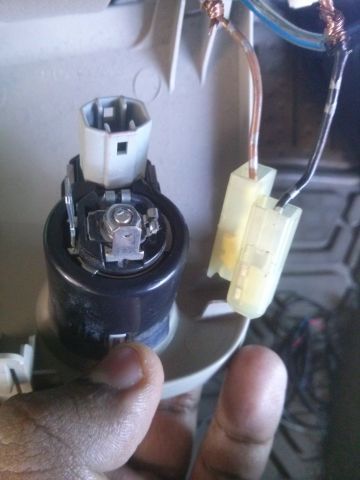
Step 1. Grab your charger. We are going to open it as we need to run 2 wires from the "contacts". As a general guide, to open these cigarette lighter plugs, you start by unscrewing the black round piece to the bottom of the picture(1. on the above picture). Then you pull the fuse out and lay those parts aside. Now, if your plug is exactly as pictured, you will need to grab the chrome ring(circular chrome ring thats just behind the black circular part we unscrewed), grab the chrome ring with 2 fingers and twist it(2.), it should pop out in your hand and you can set this aside. Now, begin to separate the plastic housing(3.)
If you have further difficulty with this step, feel free to let me know and I will update this write up including more detailed steps or you can just look it up youtube.
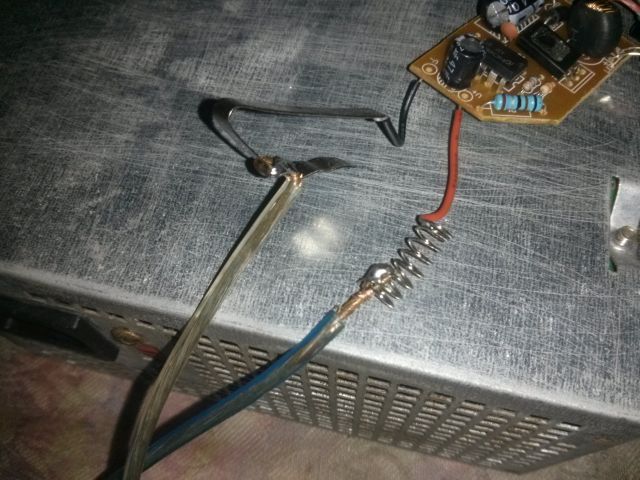
Step 2. So now that we've got the charger apart, what we need to do is connect the positive(+) and negative(-) of the inputs of the plug to 2 wires. I used 18 gauge speaker wire but you can pretty much use any wire thats not thinner than the existing wiring than the wires at the actual socket in your car.(More on that later)
When you look at the opened charger, you'll notice a spring in the center and 2 metal contacts to the sides. Attached to the spring is a red wire, this is our positive(+) and one of the metal contacts to the sides with the black wire going to it is our negative(-). We need to connect our 2 wires here. This can be done a number of ways but I opted for simplicity and lightly soldered my wires in place.
Note: This is highly recommended as in an automotive environment, if the wires aren't securely attached, with movement and vibration the wires can eventually come loose and fail to make contact. You do not want this as it will most likely cause your dash cam to shut off and that wouldn't be good in the event of a collision.
Step 3. Great, you've come this far, the hard part is over. We can reassemble the plug at this point and be out to the car and begin wiring but I opted to insulate my joints using electrical tape as an added measure of protection against short circuiting.
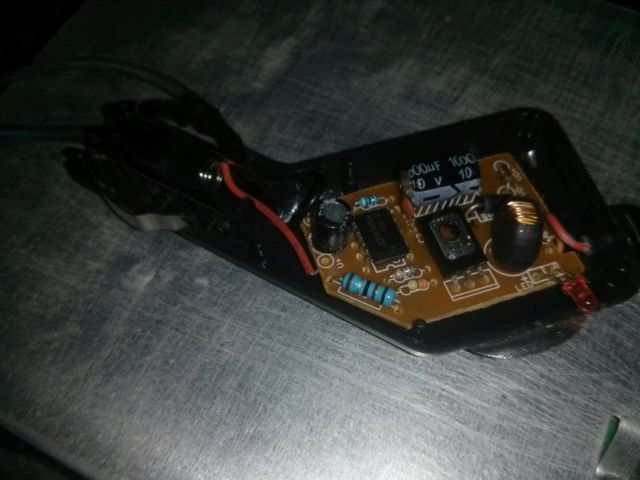
As shown in the picture, although a bit dark, is the entire plug modded and ready to be snapped back together.
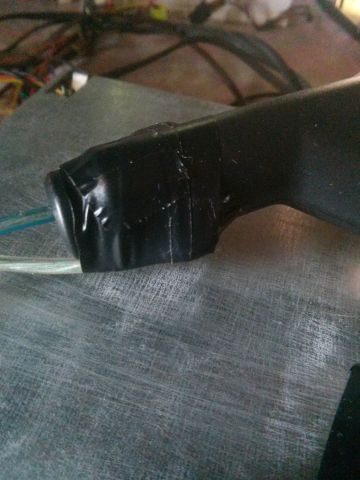
After i snapped the plastic together again, I wrapped electrical tape over the metal contact which I had soldered my wire onto in order to reduce the risk of a ground loop. You do not want the metal behind the dash rubbing against the contact. It also helps to neaten the whole mod.
Step 4. Here comes the fun part. Now, we go out to the car and disassemble the dash. We need to remove the cigarette lighter dash panel to access the wires behind it in order to wire in our new mod. Once you get behind the cigarette lighter, you will need to remove the 2 prong plug attached at the back of the socket. Once removed, look at the orientation of the plug and then look at the back of the socket itself, the top prong is attached to a circle located in the center of the socket, this is our positive(+) and at the side, there is another prong which attaches to the side of the socket, this is our negative(-).
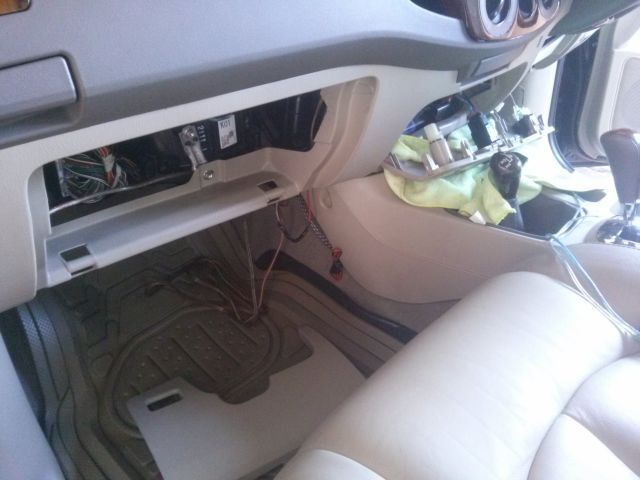
Don't mind the miscellaneous wire, I redid some of my amp wiring while I was under the dash so it all fit together a bit better.
Here is the back of the socket. Disregard the gray plug. Our concern is with the 2 pieces of metal jotting out from the black barrel.
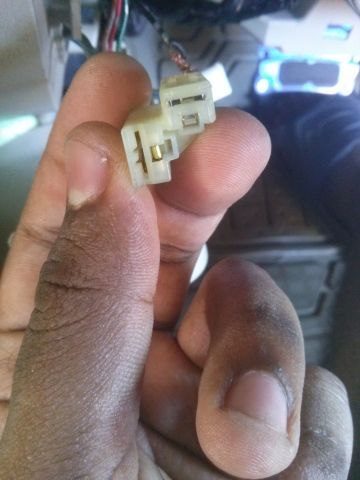
Notice how the plug only fits 1 way. The top "slot" is where we need to wire our positive(+) from the modified plug and to the "slot" thats to the side is where we want our negative(-) wire from our modified charger to be connected.
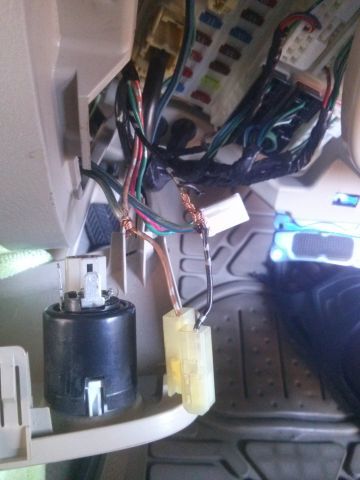
By taking a pair of pliers or wire strippers(NOT CUTTERS), we easily peel back the insulation of the 2 wires attached to the plug. Be very careful not to cut the wires as we don't need to cut them, this will prevent the socket from working and we don't want that happening.
Now, we can do this several ways but since I'm not sure how long my dashcam is going to last, I opted to twist my wires, that is the positive of the modded charger to the positive wire of the cigarette lighter wiring harness and the negative of the modded charger to the negative of the cigarette lighter wiring harness.
Once this is done, we need to insulate our 2 connections, I did this by using electrical tape but for more permanent installations you can use heat shrink, crimp connectors or solder. Be sure to wrap the tape properly around both connections for solid reliability.
Step 5. At this stage, its a matter of securing our charger behind the dash and running our wire to where our accessory is located. I simply zip tied the charger to a small dash harness that was ran behind the cigarette lighter panel with 2 zip ties and I used a third zip tie to guide the wire a little better so that it wouldn't flap around and hit against the plastic of the lighter panel and rattle.(After all Trinidad roads can make even the smoothest car feel bumpy).
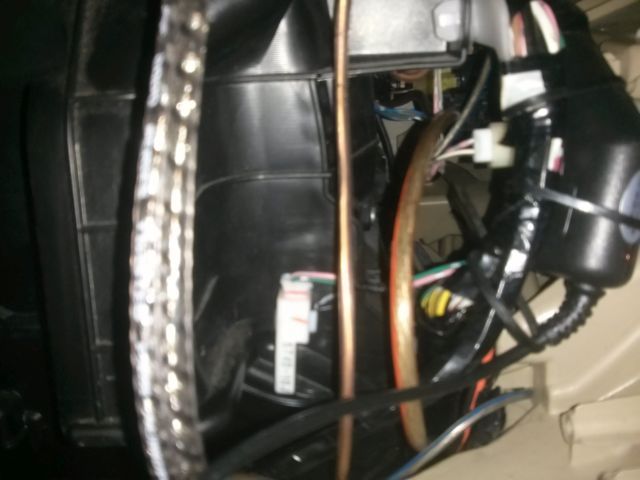
Pictured to the right side, there is our charger all zip tied and nestled under the dash, keeping our socket free and our wiring out of sight, and more importantly, out of mind")
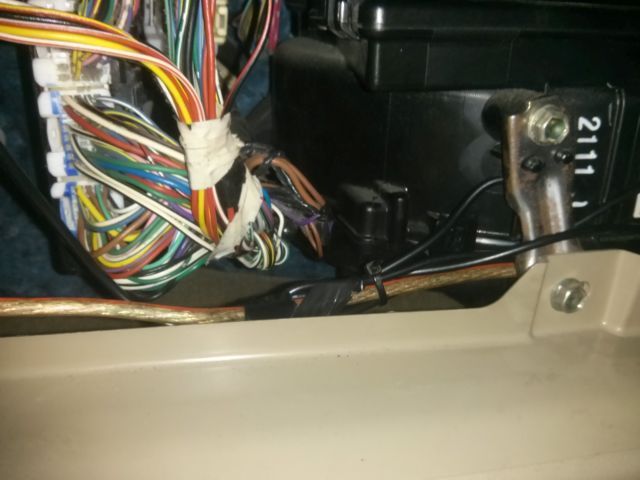
Here I ran my wire alongside the aftermarket wiring for the Power seats, I taped it up in some areas to prevent rattles should it knock against the plastic dashboard. If you are wiring a dash cam and you are wiring it to behind the rear view mirror area, you can simply run your wire behind the glovebox and up the A pillar and alongside the roof.
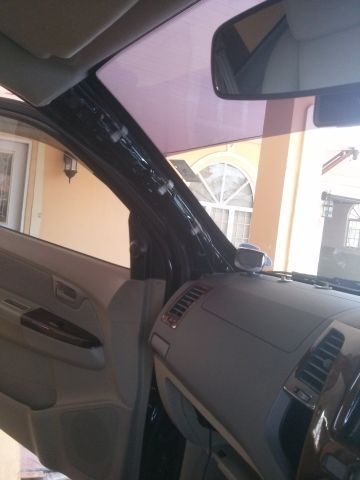
A pillar removed so I could run my dashcam wire.
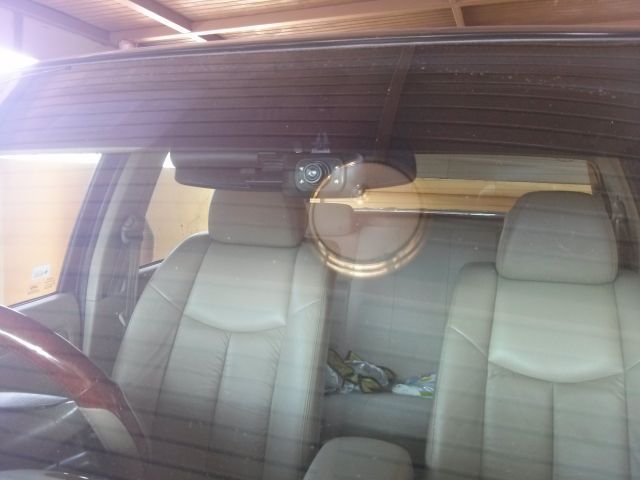
Here is the final result, the only exposed wiring is where we had to connect to the dashcam.
Thats all there is to it, enjoy your wire free accessories that turn on and turn off with your car
Thank you for taking the time to go through my write up, please leave me feedback as this is my first ever write up and I hope that it will be helpful for you in your endeavours.
Now every accessory that uses a charger as pictured below can be utilized with this guide.

Lets get into it:
Step 1. Grab your charger. We are going to open it as we need to run 2 wires from the "contacts". As a general guide, to open these cigarette lighter plugs, you start by unscrewing the black round piece to the bottom of the picture(1. on the above picture). Then you pull the fuse out and lay those parts aside. Now, if your plug is exactly as pictured, you will need to grab the chrome ring(circular chrome ring thats just behind the black circular part we unscrewed), grab the chrome ring with 2 fingers and twist it(2.), it should pop out in your hand and you can set this aside. Now, begin to separate the plastic housing(3.)
If you have further difficulty with this step, feel free to let me know and I will update this write up including more detailed steps or you can just look it up youtube.
Step 2. So now that we've got the charger apart, what we need to do is connect the positive(+) and negative(-) of the inputs of the plug to 2 wires. I used 18 gauge speaker wire but you can pretty much use any wire thats not thinner than the existing wiring than the wires at the actual socket in your car.(More on that later)
When you look at the opened charger, you'll notice a spring in the center and 2 metal contacts to the sides. Attached to the spring is a red wire, this is our positive(+) and one of the metal contacts to the sides with the black wire going to it is our negative(-). We need to connect our 2 wires here. This can be done a number of ways but I opted for simplicity and lightly soldered my wires in place.
Note: This is highly recommended as in an automotive environment, if the wires aren't securely attached, with movement and vibration the wires can eventually come loose and fail to make contact. You do not want this as it will most likely cause your dash cam to shut off and that wouldn't be good in the event of a collision.

Step 3. Great, you've come this far, the hard part is over. We can reassemble the plug at this point and be out to the car and begin wiring but I opted to insulate my joints using electrical tape as an added measure of protection against short circuiting.

As shown in the picture, although a bit dark, is the entire plug modded and ready to be snapped back together.

After i snapped the plastic together again, I wrapped electrical tape over the metal contact which I had soldered my wire onto in order to reduce the risk of a ground loop. You do not want the metal behind the dash rubbing against the contact. It also helps to neaten the whole mod.
Step 4. Here comes the fun part. Now, we go out to the car and disassemble the dash. We need to remove the cigarette lighter dash panel to access the wires behind it in order to wire in our new mod. Once you get behind the cigarette lighter, you will need to remove the 2 prong plug attached at the back of the socket. Once removed, look at the orientation of the plug and then look at the back of the socket itself, the top prong is attached to a circle located in the center of the socket, this is our positive(+) and at the side, there is another prong which attaches to the side of the socket, this is our negative(-).

Don't mind the miscellaneous wire, I redid some of my amp wiring while I was under the dash so it all fit together a bit better.

Here is the back of the socket. Disregard the gray plug. Our concern is with the 2 pieces of metal jotting out from the black barrel.

Notice how the plug only fits 1 way. The top "slot" is where we need to wire our positive(+) from the modified plug and to the "slot" thats to the side is where we want our negative(-) wire from our modified charger to be connected.

By taking a pair of pliers or wire strippers(NOT CUTTERS), we easily peel back the insulation of the 2 wires attached to the plug. Be very careful not to cut the wires as we don't need to cut them, this will prevent the socket from working and we don't want that happening.
Now, we can do this several ways but since I'm not sure how long my dashcam is going to last, I opted to twist my wires, that is the positive of the modded charger to the positive wire of the cigarette lighter wiring harness and the negative of the modded charger to the negative of the cigarette lighter wiring harness.
Once this is done, we need to insulate our 2 connections, I did this by using electrical tape but for more permanent installations you can use heat shrink, crimp connectors or solder. Be sure to wrap the tape properly around both connections for solid reliability.
Step 5. At this stage, its a matter of securing our charger behind the dash and running our wire to where our accessory is located. I simply zip tied the charger to a small dash harness that was ran behind the cigarette lighter panel with 2 zip ties and I used a third zip tie to guide the wire a little better so that it wouldn't flap around and hit against the plastic of the lighter panel and rattle.(After all Trinidad roads can make even the smoothest car feel bumpy).

Pictured to the right side, there is our charger all zip tied and nestled under the dash, keeping our socket free and our wiring out of sight, and more importantly, out of mind

Here I ran my wire alongside the aftermarket wiring for the Power seats, I taped it up in some areas to prevent rattles should it knock against the plastic dashboard. If you are wiring a dash cam and you are wiring it to behind the rear view mirror area, you can simply run your wire behind the glovebox and up the A pillar and alongside the roof.

A pillar removed so I could run my dashcam wire.

Here is the final result, the only exposed wiring is where we had to connect to the dashcam.
Thats all there is to it, enjoy your wire free accessories that turn on and turn off with your car
Thank you for taking the time to go through my write up, please leave me feedback as this is my first ever write up and I hope that it will be helpful for you in your endeavours.