
- Joined
- Nov 13, 2014
- Messages
- 2,914
HID Kits have become very popular. From the variation in colour temperature to the intensity, they are some of the best lighting upgrades if done properly. Unfortunately, for most people, it is a means by which they see better at the expense of other people's night time vision.
Before we go any further, what is HID? HID stands for High Intensity Discharge. HID bulbs function very differently from the regular halogen bulbs found in most cars. HID Bulbs are Xenon Short-Arc bulbs by design and are built to function very very differently from a halogen bulb with a filament. HID lighting systems consist of using a Ballast and a Bulb. The Ballast controls/limits the amount of current draw the HID bulb draws in addition to boosting the voltage for the bulb to run optimally. HIDs run at high voltages with start up voltages reaching 23,000volts and dropping as low as 85V once properly warmed up. The advantage is that HID lights consume around 1-2 amps whereas halogen bulbs can consume much more and also produce more heat.
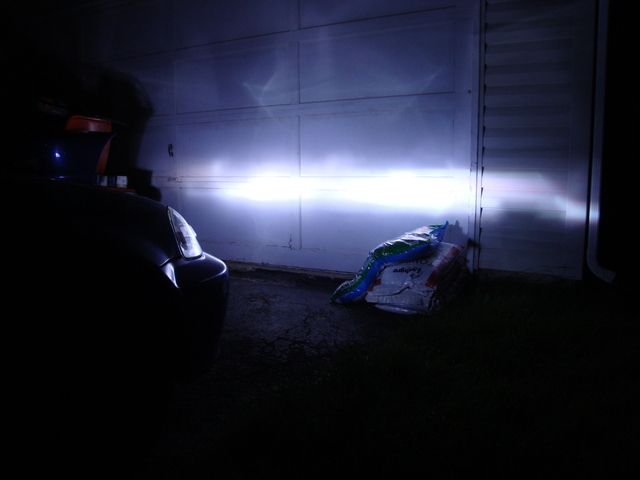
This is what most people's HIDs look like.
This is what properly installed HID lights look like.

If you notice in the first picture, light is very scattered and the entire area is lit up from the HIDs. There is no definite "cut-off line" as in the second picture where there is a sort of Z with a step down thats razor sharp and prevents any light above a certain point.
The reason why this razor sharp cut off is very important is so that light does not travel above a certain height and into the eyes of oncoming drivers.
Here is a shot of what it looks like driving towards people who have HIDs installed in their regular factory reflector lights... Notice the glare, very representative of the first picture above.

Now, as referenced to the second picture, this is what it looks like driving toward someone with properly installed HID lights.
Notice the ability to clearly see what you are looking at, the ability to not be lit up by stray light.Representative of the second picture where the cut-off is "razor sharp".

When we install HIDs in our Halogen based headlights, we are taking a different light source and attempting to retrofit it into something it was not made for.

Notice on the "55W H3"there is a line drawn just after the filament on the bulb. The filament on a halogen bulb is where light emits. This is the source of light. Manufacturers design their headlights based on the characteristics of different bulbs to emit light. When we install HID in these lights, we are changing the way light spreads out as we have effectively shifted the source of the light. On the "Philips D2S HID" the blue line represents where the filament resides on the H3 Halogen bulb. Notice the circle inside the HID bulb. We have changed the focal point of the light source. Factory headlights were not designed with this different focal point in mind and this is the key reason why HID lights produce so much glare above the cut off.
Also, in reflector lights, light was not meant to spread out to hit the base of the reflector as this light would then refract into the on coming driver's eyes and result in glare and an inability to see. Knowing this, the manufacturer designs the headlight to spread light with a reasonable cut off line. Some people install Casper Shields with their HID lights in an attempt to prevent light from hitting the base of the reflector, which is what causes glare to begin with.
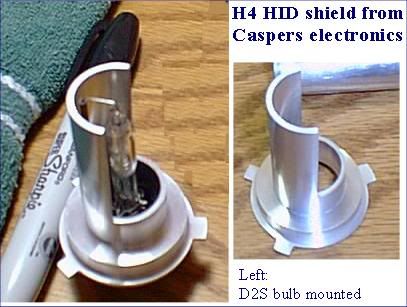

Notice the lack of glare. Observe how light escapes through the top and sides of the headlight but not from the base. By using a Casper Shield it is possible to greatly eliminate glare when using HIDs.

Notice the relative lack of glare. This is not an ideal solution for using HID since it is a completely different light source to halogen bulbs which requires a different optics in order to perform optimally.
Problems associated with using HIDs are not limited to glare but also hot spots and improper beam pattern resulting in an inability for the driver to see where he is headed. Sometimes hot spots are so concentrated in one area it prevents the driver from seeing anything to the sides of the road.
People always say HID lights just blind people, its blue, etc... These are misconceptions. Properly installed HID lights are the best lighting upgrade anyone can do their vehicle but it comes at a cost.
An HID Retrofit involves opening your headlights and installing a pair of real HID projectors.


Shown above is the procedure of bolting HID projectors into regular reflector headlight housings.

Here is the beam pattern and light spread from an HID Projector Retrofit using good quality FX-R Projectors and an OEM Grade HID kit. Notice the width, intensity, smoothness and sharp cut off. This is what properly installed HID looks like. Its not hazardous to anyone and gives you the maximum benefit.

A set of Lexus LS430 Left Hand Drive projectors retrofitted into a Toyota 4Runner. Absolutely beautiful.
So to answer the question, you can do whatever you like and use HID in reflector lights but as shown above, it is strongly advised not to do so. It is better to use a casper shield if you absolutely must have your HID lights for style. However when it comes to real performance you need to do a projector conversion as even using halogen projectors with HID is not going to yield anything near the results shown above.
Most people are of the assumption that a projector is a projector. This is false. HID Projectors are specifically built to work with HID bulbs which are given a socket of "D1S", "D2S, "D2R" and so on. The "S" at the end denotes an HID Projector based bulb and the R at the end denotes a factory HID Reflector setup. Cars do come from the factory with HID Reflector headlights but the manufacturer builds the headlight to work with the HID bulb to maximize the different light source.
I have spent a lot of time in doing the research and this is what I have come to understand about the different light sources. I have personally installed HID previously in halogen projectors and I was not totally disappointed with the results but the halogen bulb just functions best in what its designed for.
Before we go any further, what is HID? HID stands for High Intensity Discharge. HID bulbs function very differently from the regular halogen bulbs found in most cars. HID Bulbs are Xenon Short-Arc bulbs by design and are built to function very very differently from a halogen bulb with a filament. HID lighting systems consist of using a Ballast and a Bulb. The Ballast controls/limits the amount of current draw the HID bulb draws in addition to boosting the voltage for the bulb to run optimally. HIDs run at high voltages with start up voltages reaching 23,000volts and dropping as low as 85V once properly warmed up. The advantage is that HID lights consume around 1-2 amps whereas halogen bulbs can consume much more and also produce more heat.
This is what most people's HIDs look like.
This is what properly installed HID lights look like.
If you notice in the first picture, light is very scattered and the entire area is lit up from the HIDs. There is no definite "cut-off line" as in the second picture where there is a sort of Z with a step down thats razor sharp and prevents any light above a certain point.
The reason why this razor sharp cut off is very important is so that light does not travel above a certain height and into the eyes of oncoming drivers.
Here is a shot of what it looks like driving towards people who have HIDs installed in their regular factory reflector lights... Notice the glare, very representative of the first picture above.
Now, as referenced to the second picture, this is what it looks like driving toward someone with properly installed HID lights.
Notice the ability to clearly see what you are looking at, the ability to not be lit up by stray light.Representative of the second picture where the cut-off is "razor sharp".
When we install HIDs in our Halogen based headlights, we are taking a different light source and attempting to retrofit it into something it was not made for.
Notice on the "55W H3"there is a line drawn just after the filament on the bulb. The filament on a halogen bulb is where light emits. This is the source of light. Manufacturers design their headlights based on the characteristics of different bulbs to emit light. When we install HID in these lights, we are changing the way light spreads out as we have effectively shifted the source of the light. On the "Philips D2S HID" the blue line represents where the filament resides on the H3 Halogen bulb. Notice the circle inside the HID bulb. We have changed the focal point of the light source. Factory headlights were not designed with this different focal point in mind and this is the key reason why HID lights produce so much glare above the cut off.
Also, in reflector lights, light was not meant to spread out to hit the base of the reflector as this light would then refract into the on coming driver's eyes and result in glare and an inability to see. Knowing this, the manufacturer designs the headlight to spread light with a reasonable cut off line. Some people install Casper Shields with their HID lights in an attempt to prevent light from hitting the base of the reflector, which is what causes glare to begin with.
Notice the lack of glare. Observe how light escapes through the top and sides of the headlight but not from the base. By using a Casper Shield it is possible to greatly eliminate glare when using HIDs.
Notice the relative lack of glare. This is not an ideal solution for using HID since it is a completely different light source to halogen bulbs which requires a different optics in order to perform optimally.
Problems associated with using HIDs are not limited to glare but also hot spots and improper beam pattern resulting in an inability for the driver to see where he is headed. Sometimes hot spots are so concentrated in one area it prevents the driver from seeing anything to the sides of the road.
People always say HID lights just blind people, its blue, etc... These are misconceptions. Properly installed HID lights are the best lighting upgrade anyone can do their vehicle but it comes at a cost.
An HID Retrofit involves opening your headlights and installing a pair of real HID projectors.
Shown above is the procedure of bolting HID projectors into regular reflector headlight housings.
Here is the beam pattern and light spread from an HID Projector Retrofit using good quality FX-R Projectors and an OEM Grade HID kit. Notice the width, intensity, smoothness and sharp cut off. This is what properly installed HID looks like. Its not hazardous to anyone and gives you the maximum benefit.
A set of Lexus LS430 Left Hand Drive projectors retrofitted into a Toyota 4Runner. Absolutely beautiful.
So to answer the question, you can do whatever you like and use HID in reflector lights but as shown above, it is strongly advised not to do so. It is better to use a casper shield if you absolutely must have your HID lights for style. However when it comes to real performance you need to do a projector conversion as even using halogen projectors with HID is not going to yield anything near the results shown above.
Most people are of the assumption that a projector is a projector. This is false. HID Projectors are specifically built to work with HID bulbs which are given a socket of "D1S", "D2S, "D2R" and so on. The "S" at the end denotes an HID Projector based bulb and the R at the end denotes a factory HID Reflector setup. Cars do come from the factory with HID Reflector headlights but the manufacturer builds the headlight to work with the HID bulb to maximize the different light source.
I have spent a lot of time in doing the research and this is what I have come to understand about the different light sources. I have personally installed HID previously in halogen projectors and I was not totally disappointed with the results but the halogen bulb just functions best in what its designed for.
Last edited:


